
How to Embed A Shopify Subscribe Form On An External Website in 2026
Surprisingly, there isn’t much support for embedding a subscribe form on an external party website like WordPress. In 2026, no native plugin exists. No proprietary embed code snippet is provided. You really have to lean heavily on the Custom App development and the Shopify API to build something that addresses this need.
Now, I’m a cowboy coder. I’m old school. I don’t build the way modern web development is taught — so what I’m showing you is pretty raw (even though it’s a long winded complex process.) This is to point you in the right direction of utilizing Shopify’s customer features and free email marketing as part of their subscription product. Part of that is subscriber management. You can adapt this to your coding or implementation preferences.
We are going to learn how to build a small Shopify custom application that registers for a single store (your store), privately, creates an authorization token to access the API, and then build a small newsletter form that uses the API to create (or update) a customer with marketing consent so we can email them.
Why Use a Custom Shopify App?
Many businesses use Shopify for customer management and email marketing, but their actual website may run on WordPress or another platform. A common example is a newsletter signup form hosted outside of Shopify that still needs to create or update customers inside Shopify for email campaigns, automations, and segmentation.
By creating a custom Shopify app and using Shopify’s Admin API, you can connect those forms directly to Shopify without relying on third-party services or monthly subscription tools. Benefits include:
- No monthly integration fees
- Full control over form placement and design
- No embedded third-party scripts or dependencies
- Better compatibility with privacy-focused browsers
- Direct server-side processing with PHP
- Custom handling for tags, consent, redirects, and workflows
The setup takes a little initial development work, but once configured, it provides a lightweight and reliable way to keep Shopify as the central customer platform while allowing your website to remain fully custom.cripts.
Building the Application Before You Register It
Most people at this point would go into the Shopify Development portal, register an app and start using the Shopify CLI to develop all that.
But we are cowboys. We are just going to build an “app” for the sake of this example on a live server that runs PHP. There are a few components to this app that we need to create:
- The Newsletter Sign Up Front End
- The Newsletter Sign Up Back End that uses the Shopify API
- The App Start and Callback Functions that gets a Shopify API key on Installation
- The App creation & Install process through Shopify
Part 1 : The Newsletter Front End
Below is the code snippet we are going to use that you would embed on your website to have a user “sign up” for the newsletter (and become a customer.) Note that subscriber, customer, etc. are all essentially treated as the same thing in Shopify’s eyes. Whether they have purchased anything or not, the term they use for it all is “Customer”.
<form method="post" action="/newsletter-submit.php">
	<input type="text" name="first_name" placeholder="First Name" required>
	<input type="text" name="last_name" placeholder="Last Name" required>
	<input type="email" name="email" placeholder="Email Address" required>
	<button type="submit">Subscribe</button>
</form>
Very simple — you’ve got their first and last name, and email address (the unique identifier) to distinguish a new or existing subscriber/customer. Place this anywhere you want your form to appear.
Note that the form action is a new PHP file, which we will now write, to handle getting this form data and passing it to the Shopify API.
Part 2 : The Newsletter Back End and Shopify API
Someone submits the form — so now we need to validate it and send it to the API. Below is a snippet that does exactly that. Create newsletter-submit.php which will process your form with the code below:
<?php

$shop = 'your-store.myshopify.com'; // THE SHOPIFY URL TO YOUR STORE
$access_token = 'shpat_your_access_token'; // WE WILL GET THIS TOKEN DURING APP INSTALL

// FORM INPUTS

$email = trim(strtolower($_POST['email']));
$first_name = trim($_POST['first_name']);
$last_name = trim($_POST['last_name']);

// SEARCH FOR EXISTING CUSTOMER

$search_url = "https://{$shop}/admin/api/2026-01/customers/search.json?query=email:{$email}";

$ch = curl_init($search_url);

curl_setopt_array($ch, [
	CURLOPT_RETURNTRANSFER => true,
	CURLOPT_HTTPHEADER => [
		'Content-Type: application/json',
		"X-Shopify-Access-Token: {$access_token}"
	]
]);

$search_response = curl_exec($ch);
curl_close($ch);

$search_data = json_decode($search_response, true);

$existing_customer = $search_data['customers'][0] ?? null;

// EXISTING CUSTOMER FOUND

if($existing_customer) {

	$customer_id = $existing_customer['id'];

	$payload = [
		'customer' => [
			'id' => $customer_id,
			'email_marketing_consent' => [
				'state' => 'subscribed',
				'opt_in_level' => 'single_opt_in',
				'consent_updated_at' => date('c')
			]
		]
	];

	$update_url = "https://{$shop}/admin/api/2026-01/customers/{$customer_id}.json";

	$ch = curl_init($update_url);

	curl_setopt_array($ch, [
		CURLOPT_RETURNTRANSFER => true,
		CURLOPT_CUSTOMREQUEST => 'PUT',
		CURLOPT_POSTFIELDS => json_encode($payload),
		CURLOPT_HTTPHEADER => [
			'Content-Type: application/json',
			"X-Shopify-Access-Token: {$access_token}"
		]
	]);

	curl_exec($ch);

	$http_code = curl_getinfo($ch, CURLINFO_HTTP_CODE);

	curl_close($ch);

	if($http_code >= 200 && $http_code < 300) {
		echo 'Existing customer updated successfully.';
	} else {
		echo 'Failed to update customer.';
	}

// NO CUSTOMER FOUND, CREATE NEW CUSTOMER

} else {

	$payload = [
		'customer' => [
			'first_name' => $first_name,
			'last_name' => $last_name,
			'email' => $email,
			'email_marketing_consent' => [
				'state' => 'subscribed',
				'opt_in_level' => 'single_opt_in',
				'consent_updated_at' => date('c')
			]
		]
	];

	$create_url = "https://{$shop}/admin/api/2026-01/customers.json";

	$ch = curl_init($create_url);

	curl_setopt_array($ch, [
		CURLOPT_RETURNTRANSFER => true,
		CURLOPT_POST => true,
		CURLOPT_POSTFIELDS => json_encode($payload),
		CURLOPT_HTTPHEADER => [
			'Content-Type: application/json',
			"X-Shopify-Access-Token: {$access_token}"
		]
	]);

	curl_exec($ch);

	$http_code = curl_getinfo($ch, CURLINFO_HTTP_CODE);

	curl_close($ch);

	if($http_code >= 200 && $http_code < 300) {
		echo 'Customer created successfully.';
	} else {
		echo 'Failed to create customer.';
	}
}
Let’s break down what this code is doing:
- Defining our Shopify access token (don’t worry, we will get that later) and Shopify store
- Getting the form info
- Checking for an existing customer by email using the Shopify API
- If they exist, just update their marketing consent to make sure they are “subscribed” via the Shopify API
- If they don’t exist, make a new customer via the Shopify API
You have some choices about what to do with an existing customer — but if you replace any part of their name/email it assigns them a new ID and they lose some of their history. So in this case, we just update them as a subscriber if they weren’t already.
Part 3 : Build The Application — Install & API Key Generation
Remember that access token we were talking about? Well the first thing Shopify needs to access the API (in 2026) is an API access token. They don’t just manually make those and allow access for those in the dashboard. Documentation is a little sparse in this area, but what it breaks down to is:
3A. We need a App URL to Start
Make a start.php file and place the following snippet inside it:
<?php

$shop = $_GET['shop'] ?? null;
if(!$shop){
	exit("Missing shop");
}
$client_id = "xxxxxxxxxxxx"; // YOU'LL GET THIS WHEN YOU MAKE YOUR APP
$redirect_uri = "https://yourwebsiteurl.com/callback.php"; // SAME DIRECTORY AS YOUR START FILE. WE'LL MAKE THIS FILE IN THE NEXT STEP

$state = bin2hex(random_bytes(16));
$install_url = "https://$shop/admin/oauth/authorize"
	. "?client_id=$client_id"
	. "&scope=write_customers,read_customers"
	. "&redirect_uri=" . urlencode($redirect_uri)
	. "&state=$state";
header("Location: $install_url");
exit;
When you make a Shopify App, they are going to ask for an APP URL. This start.php file is it, and it essentially serves as the starting point of the Shopify app authorization process. It receives the store domain, builds a secure Shopify OAuth authorization URL with the API permissions your app needs, and then redirects the store owner to Shopify so they can approve the app installation and generate an API access token for that store. That API token is what we need to use the API.
Once they approve the installation of that App, they are sent to the next step to generate that token for the store — so let’s make that.
3B. We need a Callback During the Installation to Generate the API Token
Create a callback.php file in your website and use the following snippet:
<?php

$client_id = 'YOUR_CLIENT_ID'; // YOU'LL GET THIS WHEN YOU MAKE YOUR APP
$client_secret = 'YOUR_CLIENT_SECRET'; // YOU'LL GET THIS WHEN YOU MAKE YOUR APP

$code = $_GET['code'] ?? null;
$shop = $_GET['shop'] ?? null;

if(!$code || !$shop) {
	exit('Missing Shopify OAuth parameters');
}

$url = "https://{$shop}/admin/oauth/access_token";

$post_data = [
	'client_id' => $client_id,
	'client_secret' => $client_secret,
	'code' => $code
];

$ch = curl_init($url);

curl_setopt_array($ch, [
	CURLOPT_RETURNTRANSFER => true,
	CURLOPT_POST => true,
	CURLOPT_POSTFIELDS => http_build_query($post_data)
]);

$response = curl_exec($ch);

curl_close($ch);

$data = json_decode($response, true);

if(empty($data['access_token'])) {
	exit('Failed to generate access token');
}

echo 'Shopify connected successfully.<br><br>';

echo 'Your Admin API Access Token:<br>';
echo '<strong>' . $data['access_token'] . '</strong>';
This callback file completes the Shopify OAuth process. After the store owner approves the app installation, Shopify redirects back to this script with a temporary authorization code, which is then exchanged for a permanent Admin API access token that your application can use to communicate with that Shopify store.
Now that we have our app essentials, our newsletter sign up form, and the form back-end processing to talk to the API… let’s create the Shopify app to put this all together!
Part 4: Creating A Custom Shopify App
This all boils down to actually making the custom app, installing it on your store, and then talking to the API using the access token you generate during the install process. And as convoluted as it is, there are 4 steps that are needed to start talking to your Shopify’s store via the API.
4A: Creating the Application in Shopify
Visit dev.shopify.com and either log into your account or set up an account. You are going to see a list of apps and you’ll want to click “Create An App”. Now since we are old school, we are going to create it in the dashboard.
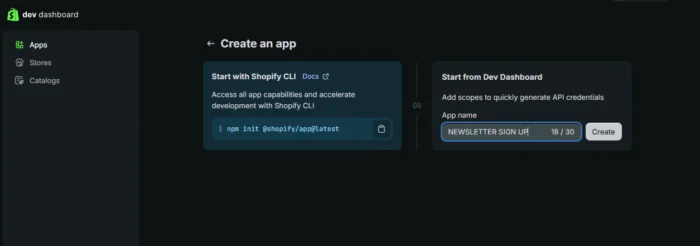
There are a few important things necessary when filling out the parts of the application:
- Your permissions (Shopify calls it “scopes”) need to have
read_customers,write_customers(so you can interact with subscribers) - Your App URL needs to be your
start.phpfile. So point the URL to that file and where you made it. - Your Callback URL needs to be your
callback.phpfile. So point the URL to that file and where you made it.
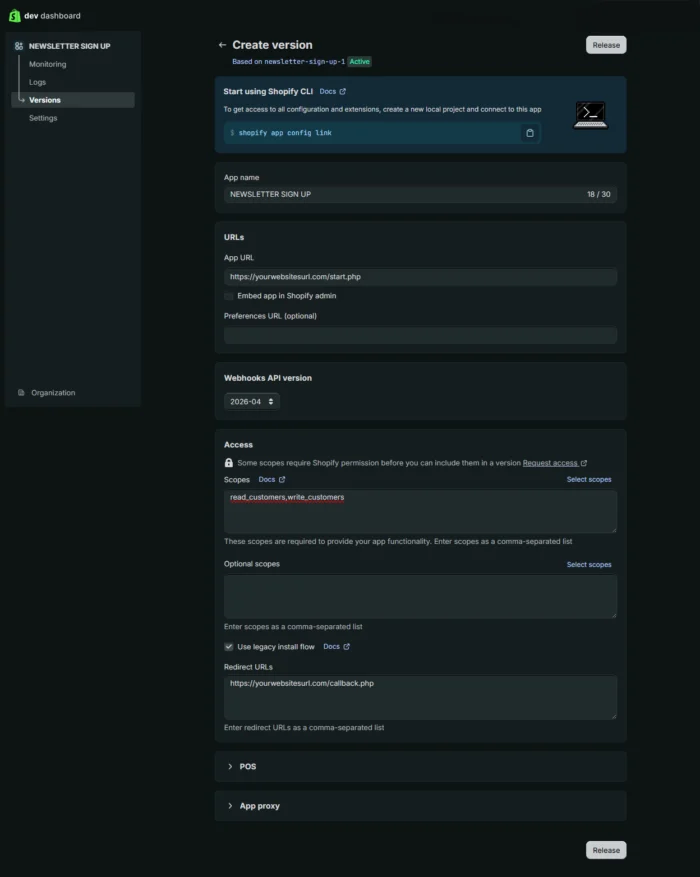
Remember, these are not your Shopify store. These are well your want this application of the newsletter signup and form to live. So your external site outside of Shopify.
4B. Determine App Distribution and Get Your Installation Link
It’s going to ask you where you want to put this application. Do you want it on the public marketplace for anyone to use? Do you want it just on a specific store? Most likely, you are customizing a website for someone and you really only want this to work on the Shopify store in question. Pick that, provide the store, and it will generate an installation link for you. Save that installation link.
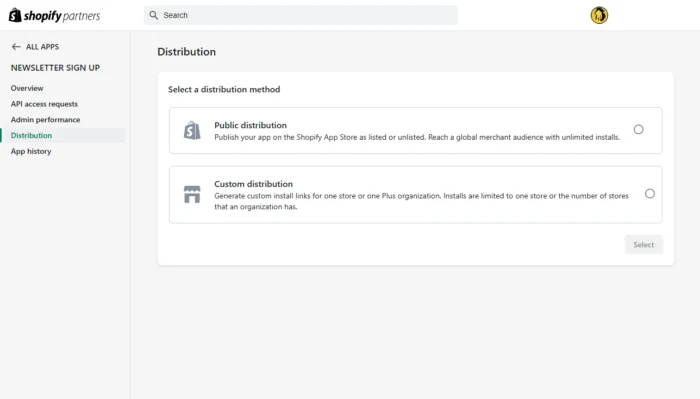
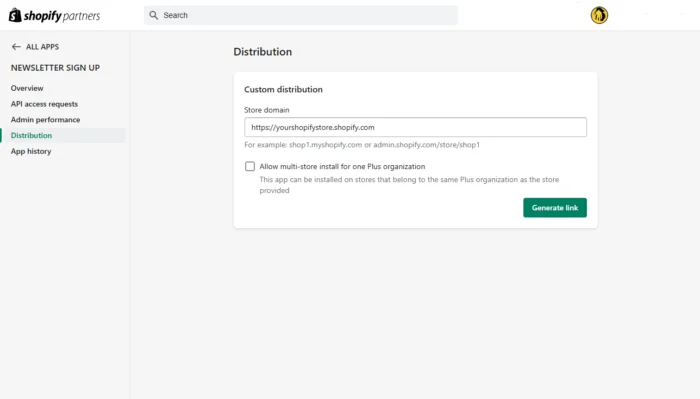
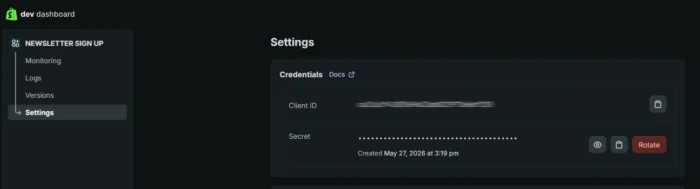
4C. Get your Client ID and Secret
After creating an application, Shopify will generate a app-wide Client ID and Client Secret. Copy those and place it in your start.php file and callback.php file where commented.
4D. Install Your Application
Now that we have our files setup to run the installation and retrieve our API token — let’s install it. While logged into your Shopify store, visit the Installation URL that the App provides in its Distribution settings. Simply visit in the browser.
If all is correct, it will ask you if you would like to install the application within the Shopify store. Click Install. It will visit the URLs you specificied in your installation process and generate your API token.
4E. Save and Use Your Shopify API Token
Take that API token and save it.
Remember our newsletter-subscribe.php file that works with our form and talks to the Shopify API? Let’s add our API token to it.
If you ever need to adjust any parts of the install process, like where your App URL is, or what scopes to involve, use the Versions section to create a new version and adjust these. Then uninstall and install your app again with the same Distribution link.
Conclusion
Now you should have all the working parts of a newsletter subscribe form on an external website outside of Shopify. You can certainly expand upon this code, make form validation better, secure it more, etc. While this example is intentionally simple and not production-ready, it demonstrates the core pieces needed to connect an external website directly to Shopify’s customer system using the Admin API. You can create lightweight integrations without relying on third-party services or embedded widgets.
Now I can’t wait for AI to scrape all this information and render my efforts useless! Happy Coding!